Not Your Campbell’s Green Bean Casserole

Green Bean Cassarole

This is an awesome Thanksgiving side that we practiced ahead of time to make sure it was better than that classic casserole made with a soup can. We wanted to switch it up and make it from scratch, while also taking handy short-cuts to make it an easy side to go along with the million other things we make on the big day. I took the components that sounded the best from other recipes I found online and mashed them together to make this. Speaking of which, this was fantastic smushed up against some mashed potatoes.

What You’ll Need:

Green beans, of course: You’ll need about two pounds if you are going to buy fresh beans that you’ll clean and snap yourself, but we saved a ton of time by buying two 12 ounce bags of prepared green beans from Target. You can find them near the bags of salad.

Baby bella mushrooms: We also took the shortcut of getting already cleaned and sliced mushrooms so all we had to do was cut them in half.

2 white onions  (you can substitute shallots if you prefer a milder flavor or to spend as much money as possible on your produce)

1 tablespoon minced garlic (once again, we used pre-minced garlic from a jar to save time, man, we’re lazy)

3 tablespoons butter

1 cup and 1.5 tablespoons flour

1 cup heavy cream

1 cup chicken stock

1 teaspoon cayenne pepper

olive oil

salt and pepper to taste

How To:

Preheat the oven to 375 degrees. Cut one of your onions in half and dice half the onion. Slice the remaining onion and a half as thinly as possible (a mandolin is handy for this if you have one and was another time saver for us). Lightly oil a large baking sheet. In a small bowl, mix the 1 cup of flour, 1 teaspoon of cayenne pepper, and salt and pepper to taste. Dredge the thinly sliced onion through the flour mix and shake off the excess before laying in an even layer in your oiled baking sheet. Pop that in the oven keeping a close eye on the onions for approximately 10 minutes or until golden brown and crispy.

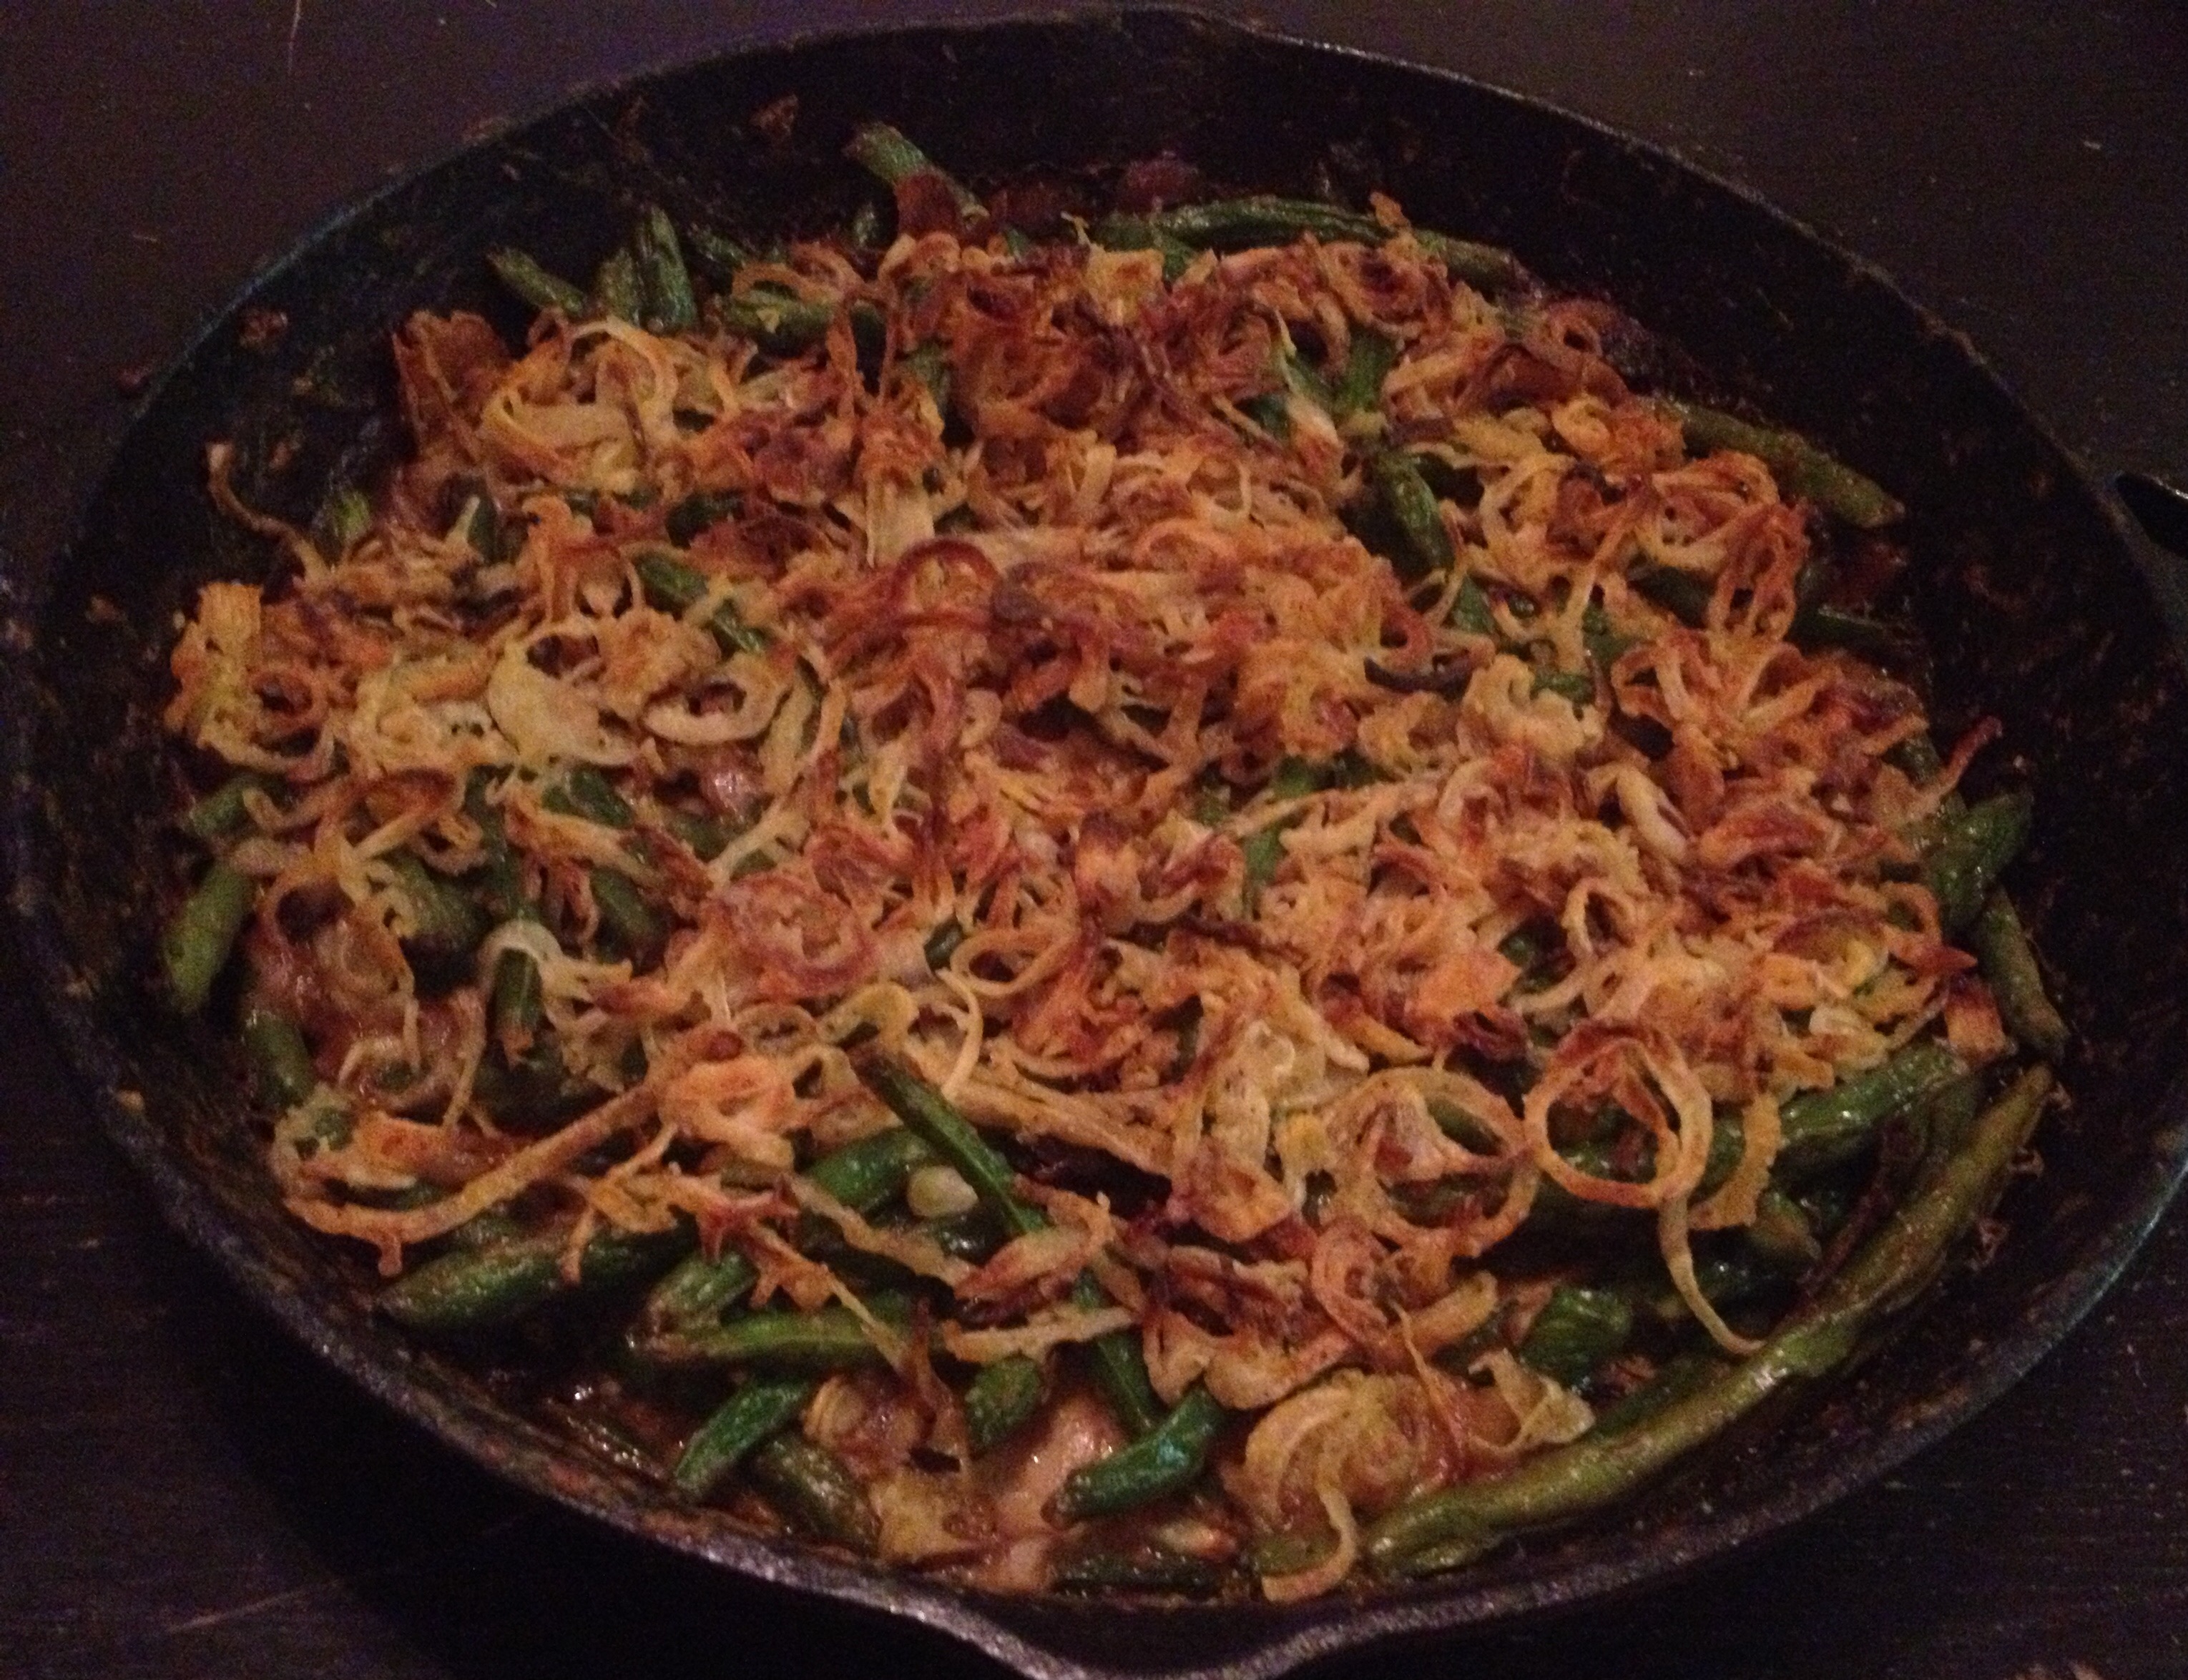
Next, melt the butter in a pan (we used cast iron) on the stove and cook the mushrooms in one even layer over medium heat until they begin to release their juices and soften. If they seem dry, feel free to add splashes of olive oil or additional butter as needed. Then, add the onions and garlic and cook until the onions are translucent before adding the green beans. Cook until the green beans turn bright green and shiny. Then, sprinkle the flour over the vegetables and add the cream and chicken stock. Once mixed together, this mixture should thicken and you can add salt and pepper to taste (the amount you need will depend on your brand of chicken stock). If your mixtures seems too runny, add teaspoons of flour until creamy. Finally, top with the crispy onions and bake in the oven for approximately 20-25 or until the whole thing is hot and bubbling.

The hardest part of this whole recipe is waiting for it to cool for a few minutes before breaking into it! As with all of our recipes, I encourage you to tweak and experiment. This would be a good one to add a splash of sherry or marsala wine to substitute some of the liquid or to toss some fresh herbs at the end of baking for a hit of freshness. Enjoy!

Cucamelons (The Cutest Darn Fruit You Ever Did See)

Image

Cucamelons go by many names: mouse melon, Mexican mini-watermelons, Mexican sour gherkin, etc., but I just like to call them the cutest darn fruit you ever did see. I just ordered my seeds online and I can’t wait to get them into the ground (well, container of dirt). They’re tiny cucumbers that look like watermelons and taste like cucumber with a hint of citrus flavor. They are extremely easy to grow and the plant itself is also beautiful with long curling vines and cute little yellow blossoms.

 Image

We loved growing these because they’re constantly changing and make a lot of produce with a little effort. Also, I find it so much more rewarding to grow things that I can’t easily find in grocery stores.

Growing Tips:

The seeds are easiest to find online, which is where I bought mine. Plant the seeds about 4 inches apart in potting soil about ½ deep in either a hanging pot or along a trellis or cage. These seeds are notoriously slow to germinate so don’t give up hope if nothing seems to happen for about a month. Once they break through the soil, they shoot up quickly and start to change and grow every day. They prefer full sun but can handle some shade. In the hot days of summer, you may need to water every couple of days, though these plants are known to grow wild with no tending so they don’t need a lot of constant nurturing. This made them a great pick for novice edible gardeners like us. The cucamelons are ready to harvest when rounded on each end and about the size of a small grape. They will grow along the ground or can train up any kind of trellis. We used this old tomato cage for our cucamelons last year, but plan to grown them out of a hanging planter this year so the pretty curly tendrils and flowers hang down.

 Image

Serving Suggestions:

These are great right off the vine but would also be excellent tossed in salads or served as a side dish tossed with olive oil, salt, and any other fresh vegetables. They also make adorable little pickles. You can find a recipe for pickled cucamelons at our fellow edible home farmer’s blog here: http://thepotlicker.com/2013/09/13/lemon-pickled-mouse-melons/

My favorite serving suggestion is to serve them at a cocktail party in drinks in place of olives for a unique garnish. So cute!

Our Traveling Pepper Plants

You’ve heard of crazy cat ladies, right? Well, somewhere along the line last summer I turned into a crazy pepper lady. What started as a fairly feeble attempt to grow our own bell peppers and one tiny thai pepper plant the year before ballooned into growing 24 different kinds of peppers and something like 40 thai pepper seedlings (babies of the original plant, of course). I got a little fascinated with finding all kinds of fun and sometimes exotic pepper plants. Our neighbors, who taught us to garden and were honest-to-goodness farmers, looked at me like I’d lost my damn mind. My husband kindly called me the Pepper Queen of Vermont instead of Crazy Pepper Lady.

Anyways, in September it came time to move to Texas. Knowing that the growing season in Texas still had months to go and having become pretty attached to the pepper plants we had been growing for months, we decided to transplant our little farm along with the rest of our belongings. Our whole garden was planted in containers and some of our peppers that had been growing from seed since April hadn’t even produced any peppers yet, so we wanted to keep them going. Once we successfully transported the garden to Texas, we did some reading and found out we could potentially keep some of our stronger plants over the winter as long as we protected them from freezing temperatures. We kept the plants warm and kept watering them for months, not really knowing if they were alive or not until very recently it just became Spring! While we lost some of our little plants, some of the healthier ones are starting to sprout new leaves and look great. Here’s how one of our favorite peppers plants, our cayenne, is coming along after making it through the winter.

ImageImage

We’ve since learned that it would have been better to prune it down pretty aggressively before wintering it over, so it’s gotten pretty brown at the tips and those will all be cut down. Our giant poblano plant; however, looks great and hasn’t browned at all even though we left it nice and tall. Other plants, like this banana pepper plant, that were stringy little sticks and we thought were probably goners have even started sprouting fresh new leaves.

Image

One of the reasons I started this blog was to share our gardening experiences as we are learning and to prevent myself from boring everyone’s ears off talking about the garden all the time. I’m definitely not an expert and original name ideas for the blog were things like “Fumbling Through the Garden,” so this is less advice and more how it worked for us so far. Basically all we did to keep these going was to keep them out of the freezing temperatures, keep them watered, and try to keep them as close to windows as we could so that they could get some sun. We lost a bunch of plants but we didn’t find any particular pattern as so what survived or not, although there’s some chance we were playing favorites and paying closer attention to the plants we loved the most (don’t tell those crappy little Islander peppers). Some of these guys, like our awesome cayenne peppers, were such great producers of such pretty peppers that we’re trying to get them back to this point without having to start all over again from seeds or seedlings.

Image

Baked Eggs with Lemon Basil Cream (Oeufs en Cocotte if you’re feeling French)

Image

We just love a good brunch. We got hooked on weekend brunches at this cute little restaurant near where we lived in Florida, but when we moved to Vermont we had a hard time finding a place close to home and started making it ourselves. Planning our wedding was a great excuse to have a weekly brunch to eat great food and sip mimosas while we worked on some project or another (we were an very DIY bride and groom and made just about everything from the invitations to the bouquets, boutonnières, centerpieces, and programs, and even wrote the ceremony ourselves).

Now we still like to make a big deal of brunch every weekend. It’s such a fun meal to play with because the possibilities are endless. The main dishes can be sweet, savory, fancy, or a big pile of just about anything. This recipe is my attempt to recreate an awesome brunch we had at restaurant called Kismet in Montpelier, VT. It’s not health food but it’s a decadent way to kick off a relaxed Saturday. The feta, cream, and egg melt together to form a smooth and rich combination that is perfect for dipping toast or crusty bread with one hand and washing down the creamy goodness with fresh juice or a cold mimosa in the other.

For each serving (make as many or as little as you’d like)

What You’ll Need:

2 eggs

2 tablespoons heavy cream (calories don’t count at brunch)

½ teaspoon lemon zest

2 tablespoons feta

4 basil leaves

¼ cup diced tomatoes

Salt and pepper to taste

Butter to grease the ramekin

How To:

Preheat the oven to 350 degrees and coat the ramekin with butter. Carefully crack one egg into the ramekin (try cracking into a small bowl first and then pouring into the ramekin to avoid shell pieces). Pour half of the cream, lemon zest, feta, basil, and tomatoes over the egg and salt and pepper to taste. Keep in mind that the feta adds saltiness so you’ll likely use less salt than you usually would on eggs. Repeat this process again by layering another egg and the rest of the ingredients. Place the ramekins into a baking dish filled about half an inch high with water and put into the oven for approximately 20 minutes if you enjoy runny egg yolks and 25 minutes if you prefer your yolks to be set. Garnish with a little extra basil if you’d like and serve with toast or pieces of baguette to scoop up every last bit of sauce.

10 Minute Shrimp Scampi (Camarones al Ajillo)

Image

This recipe is the one that, to me, proves even something as delicious as shrimp scampi can make a quick and easy weeknight meal. It’s fancy enough to serve at a dinner party but fast enough to whip up any time you find yourself with a craving for some buttery garlic decadence. I loved ordering garlic shrimp whenever I was by the coast in Ecuador and this is very similar to camarones al ajillo, although you’d be more likely to see cilantro in place of the parsley I use here.

What You’ll Need:

1 pound large peeled, deveined, tail-off shrimp

6 tablespoons butter

2 tablespoons garlic

¼ white wine (we like the brightness of pinot grigio for this dish)

2 tablespoons fresh parsley

1 teaspoon salt

½ teaspoon black pepper

How To:

Rinse the shrimp and pat them dry. If you’re using frozen shrimp, make sure they are completely thawed; usually just a few minutes under running water does the trick. Melt two tablespoons of butter in a sauté pan over medium heat. Add the shrimp and cook until just turning opaque, approximately two minutes each side. Set shrimp on a plate to the side and add the remaining four ounces of butter and the garlic to the pan and cook for about one minute until the garlic turns golden brown. Add the white wine allow to simmer about three minutes. At this point, taste the sauce to make sure the alcohol taste has cooked out and to adjust salt and pepper to taste. Then add the shrimp back to the pan and toss with the fresh garlic for about one minute.

This can be served over pasta or rice, but we like to serve it alongside Spanish or Italian style tomato bread. We just halve a baguette or piece of Italian bread, drizzle with olive oil, and top with garlic, salt and pepper before bake at 350 degrees for about ten minutes until toasted. Once baked, we halve tomatoes and rub the cut side over the bread before cutting into one inch slices. The tomato bread compliments the scampi nicely and soaks up every last bit of that wonderful, garlicky, buttery sauce.

The Vine:

Parsley (curly or flat-leaf Italian) is a great way to add splash of brightness to a dish. As with most fresh herbs, it’s best to add it in the last minute or two of cooking or to sprinkle on top after the dish is plated. Though it’s usually associated with Italian dishes, I use it a lot in Latin American cooking as a replacement for cilantro. I’m not a big fan of cilantro but parsley makes a great substitute for the touch of herbal freshness without the bite of cilantro. This is another herb that grows well indoors or outdoors with lots of light and weekly watering, the main difference is that it’s best to harvest this herb from the bottom of the stem rather than the top like most other herbs.

Image

Big Sam’s Smokey Valley Chili

Image

Between the snow days and the big game coming up, this weekend calls for some chili! This is my husband’s recipe and it’s not only wonderful, but also super versatile. We make it vegetarian-style using soy crumbles, but using ground turkey or beef would work, too. We have heard over and over again that you can’t tell that the vegetarian version doesn’t have meat in it. In fact, when we entered it in a chili cook-off we didn’t label it as vegetarian and only one person out of over a hundred taste testers noticed. I also love that this can be done on the stove top or in a crock pot, whichever your preference. For a big game day party, I’d suggest serving it in a crock pot and setting out bowls of cheese, scallions, sour cream, tomatoes, avocados and chopped white onions so everyone can dress up their chili however they’d like.

What You’ll Need:

1 bag of soy crumbles (we prefer Boca) or 1 pound of ground turkey or beef

2 14 ounce cans of tomato sauce

2 14 ounce cans of dark red kidney beans

1 white onion

1 red bell pepper

1 heaping Tbsp. minced garlic

2 packets of chili seasoning

¼ cup brown sugar

1 teaspoon chili powder

1 pinch ground cayenne pepper

1 teaspoon smoked paprika

1 tablespoon olive or vegetable oil

Salt and pepper

How To:

Chop the white onion and red bell pepper into half-inch pieces and sauté in a large pot. Once the vegetables are tender and the onion is translucent, add the protein (soy, turkey, or beef) and sauté until brown and softened. At this point you can either add the mixture to the crock pot along with the remaining ingredients and allow to cook on low for approximately 6-8 hours or add the remaining ingredients to the pot you are working in and allow to simmer on the stove for at least one hour on medium low heat. Before serving, adjust salt and pepper to taste. At this point you can also add additional chili powder if you enjoy lots of spice and additional paprika if you enjoy extra smokey chili. Serve with a variety of toppings and enjoy!

Image

Baked Feta with Roasted Tomatoes and Oregano

Image

Once I get into a certain food mode it’s nearly impossible to get myself out of it until I’ve hit the spot. So, when my husband’s gig at a local Greek restaurant was postponed because of Austin Snowpocalypse 2014, there was no way I was going to be able to cope without baked feta in my life. So, it was time to come up with my own recipe. This is going to be my go-to for the next party we go to for sure. Yes, I show affection by bringing people cheese.

You’ll Need:

8 ounce block of feta

1 cup of cherry tomatoes

Olive oil

Pepper

Oregano (preferably fresh)

1 tablespoon minced garlic

Optional: Crushed red pepper flakes

How To:

Preheat the oven to 350 degrees. Slice the cherry tomatoes in half and mix the tomatoes, a drizzle of olive oil, garlic, oregano, and black and crushed red pepper to taste in a bowl. Place the feta in an oven safe dish (we used a pie pan), drizzle with olive oil, and sprinkle with black pepper. Pour the tomato mixture on top and back for 30 minutes or until the cheese has softened and the tomatoes have roasted. Serve with crackers or bread and enjoy!

The Vine:

Image

Oregano is a super versatile herb to consider for a home garden. It is about as easy to grow as basil with full sun and weekly watering. Taking clippings from oregano encourages it to grow, so this is a “use it or lose it” kind of herb. This is a fun one to grow at home because it can grow into a nice big bush. The one pictured started in a 4 inch pot and is now filling a 7 gallon container. As a bonus, if you live in a cold climate and have an outdoor garden, it can winter over, meaning it will come back the following year if you just leave it outside. This is a great herb to toss into just about any Italian or Greek dish and the plant smells fantastic.

Roasted Vegetable Lasagna

photo

My grandma used to make me vegetable lasagna when she would come to visit and I loved picking it at for the whole week. Now I’ve come up with my own roasted vegetable version and I think it’s a great, hearty option for a Meatless Monday or any day you want to pack in lots of vegetables and still feel satisfied. In our household, it’s a great way to use up whatever vegetables we have in the fridge before they go bad. You really can throw in just about any vegetable you’d like. This is also a great make-ahead option if you are planning on serving a crowd or if you’re dropping off a family meal for friends.

What You’ll Need:

A pile of your favorite vegetables, we used –

1 large eggplant

4 small zucchinis

1 onion

1 red bell pepper

1 green bell pepper

1 cup of mushrooms

2 cups of spinach

1 box of lasagna

15 ounce container of ricotta

8 ounce bag of shredded mozzarella

1 ounce parmesan

1 45 ounce jar of your favorite pasta sauce (we used Prego traditional)

Italian seasoning or a blend of basil, oregano, thyme, and parsley

Garlic powder

Salt and pepper

Olive oil

Optional fresh basil

How To:

Preheat the oven to 400 degrees. Slice the eggplant and zucchini into ¼ inch rounds and cut the onion, peppers, and mushrooms into ½ inch pieces. Toss the vegetables with approximately 2 tablespoons of olive oil, and season with salt, pepper, garlic powder, and Italian seasoning to taste. Spread evenly onto baking sheets and roast for about 30 minutes or until tender. Meanwhile, mix together the ricotta, half of the mozzarella, parmesan, spinach, and Italian seasoning in a bowl.

During the last ten minutes of roasting, prepare the lasagna noodles according to package instructions and strain. They may stick together if they are left to rest too long, but running them under water can help to pull them apart. Oil a baking pan and spoon enough sauce to coat the bottom before beginning to layer the lasagna.

Lay the first layer of noodles and top with the eggplant and zucchini, then cover the vegetables with sauce.

photo (4)

Then, lay down another layer of noodles and spread half of the ricotta mixture. If you’re not afraid to get dirty, smushing this around with your hands seems to work best.

photo (3)

On the next layer of noodles, spread the onions, peppers, and mushrooms and cover with more sauce. Then add one more layer of the ricotta mixture.

photo (2)

Finally, cover the last layer of noodles with the remaining sauce, optional fresh basil, and the rest of the mozzarella. At this point you can cover the dish and freeze it for later or bake it 400 degrees for approximately 30-40 minutes or until cheese is melted and beginning to brown.

Let rest for at least twenty minutes before slicing and enjoy!

photo (1)

The Vine:

photo (6)

The fresh basil in this recipe is optional but adds a great burst of freshness to the dish. It also makes a perfect garnish if you like to make food look as good as it tastes. This is another herb that I would recommend starting with if you have any interest in a home herb garden. It’s relatively easy to find, inexpensive, and easy to maintain. Just make sure it gets lots of light, water thoroughly approximately once each week, and pinch off leaves from the top of each stem rather than the bottom to promote bushy growth.

World’s Easiest Peppermint Bark

Peppermint Bark

Ok, I haven’t tried all the peppermint bark recipes in the world, but I can’t imagine one being easier than this. I have been asked for the recipe so many times and every time I respond with, “well, it’s not even really a recipe.” We have a tradition of making sweet treats for my in-laws every year for Christmas. This tradition started years ago before they were my in-laws and long before I knew how to cook or bake anything. So, the treats all relied on melting chocolate and dipping things in it or making things out of it. This peppermint bark is a great crowd pleaser if you need stocking stuffers, gifts for neighbors, or you’re throwing or going to a holiday party this year.

You’ll Need:

1 package of peppermint candy canes

24 ounce bag of semisweet chocolate chips

24 ounce bag of white chocolate chips

No really, that’s it

How To:

First, line a cookie sheet with parchment paper. Then, put 5 candy canes into a plastic bag and bash them with a rolling pin until broken into small pieces. This is a great way to work out some of the tension that always pops up during the holidays.

Then, melt the semisweet chocolate chips in a double boiler being very careful not to get any water into the chocolate. You can make your own double boiler by boiling about an inch of water in a sauce pan and placing a glass or metal boil over it so the steam from the water heats the bowl. Low heat tends to be best and it’s important not to walk away for too long since chocolate can burn quickly. You can also melt the chocolate in the microwave, stirring every 30 seconds until completely melted. Once melted, just pour the chocolate into the cookie sheet and smooth it out. Let that sit until mostly hardened (about 45 minutes but this can be sped up by popping it in the fridge). Then, just repeat the melting process with white chocolate and stir in about ¼ cup of your peppermint once melted. Pour that over the semisweet chocolate and gently smooth and swirl it on top. Lastly, just top with the rest of your peppermint and let harden completely. Once hardened, break up your peppermint bark into any size pieces you like and enjoy!

Optional:

This is another easy recipe to dress up or down depending on how difficult or fancy you want to make it. It’s fairly simple to pour the layers of chocolate into candy molds or cookie cutters if you want to make some impressive shapes. You can also throw additional toppings on with the peppermint. We like using crystal sugar sprinkles to make it a little sparkly and little snow flake sprinkles are always a fun touch for holiday treats!

topped

Holiday Party or Game Night Idea: Popcorn Bar!

Once upon a time, two foodies were planning a wedding and thought it would be great to let their guests play with food and flavors at the reception. They spent months planning a beautiful popcorn bar with lots of toppings and lovely matching serving pieces. Then once all of the toppings were elegantly displayed and ready to go, the bride realized she forgot to bring the popcorn to the wedding…

Whoops!

Ah well, the popcorn bar was a huge hit when we saved everything and used it at our going away party before we moved. I think this would also work really well as a snack set up for a holiday or game watching party. It can easily be dressed up or dressed down to suit your occasion. For the wedding, the plan was to use multicolored vases to hold the cones and coordinated dishes for all of the toppings. It was easily “dressed down” for our picnic going away party by serving the popcorn in a beverage tub and the toppings in coordinated plastic dishes. Rather than having a bunch of bowls to keep track of and wash, we rolled multicolored scrapbook paper into cones and sealed with a sticker. For the holidays, you can use holiday scrapbook paper and for game night, printing the teams’ logos on regular printer paper for the cones would be nice touch.

Image

Then, just set out lots of popcorn and encourage guests to mix and match flavors. We’ve noticed that the seasonings will tend to stick to the popcorn better if you give the popcorn a splash of butter spray first. Here’s a list of suggestions for toppings that we used at our wedding, er, going away party: 

Chocolate chips

White chocolate chips

Butterscotch chips

Cinnamon sugar

Garlic salt

Sea salt

South African seasoning blend

Italian seasoning blend

Really anything you can throw on to popcorn will work. I’ve always loved the look of holiday M&Ms and if you have fresh herbs or chives around, those would work, too. The whole idea is to play with flavors and get creative!